Introduction
In the early days of the web, most websites were nothing more than static pages. You could load a page, read its content, maybe click a link, and that was it. There was no real way to interact with the content by clicking buttons, submitting forms, or engaging with a page in real time.
That began to change in the mid-1990s with the introduction of JavaScript and the Document Object Model (DOM). The DOM provided a structured representation of a website, allowing developers to interact with it using code. This improvement made the web suddenly interactive, users could now hide or show content, validate forms, or even build entire interactive applications, all without reloading the page.
In this article, we will explore what the DOM is, how it works, and the different ways to interact with it using JavaScript. We’ll also look at how modern frameworks have built on these concepts with innovations like the Virtual DOM.
What is the DOM?
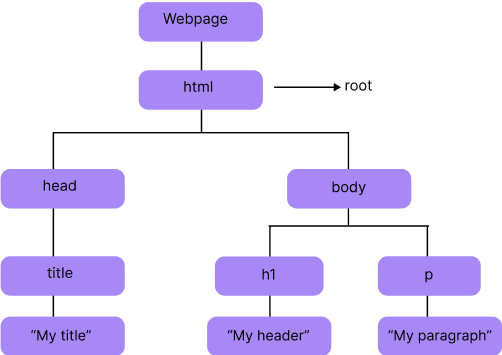
The DOM (Document Object Model) is a programming interface that represents the content of a webpage in a hierarchical structure. Each element on the page is represented as a node or object that contains information about that element. These nodes are connected through relationships, such as parent–child or sibling elements.
You can think of the DOM like a family tree: the <html> element is the ancestor at the top, its children are <head> and <body>, and each of those has their own children, like <h1>, <p>, <div>, and so on. Just like in a family tree, each node knows who its parent is and whether it has children or siblings.
This hierarchical representation makes it possible to interact with a webpage dynamically. We can select any node and modify it, remove it, or even add new nodes, which allows developers to create rich and interactive web experiences.
Why the DOM is Important
Even though most developers today work with frameworks like React or Vue, which hide much of the DOM’s complexity behind abstractions, new developers might think that learning the DOM isn’t necessary. In reality, a solid understanding of the DOM is essential before diving into frameworks. Debugging, optimizing performance, and truly mastering any modern framework all require a strong grasp of how the DOM works. In short: if you don’t understand the DOM, you’ll eventually hit walls when building interactive applications.
Working with the DOM in JavaScript
When a webpage is loaded, the browser parses the HTML file and converts it into the DOM. As we mentioned earlier, the DOM is made up of nodes, which are JavaScript objects containing properties and methods. These properties and methods are what we use to manipulate the webpage with JavaScript—such as changing text, updating styles, adding or removing elements, or handling user interactions.
Access the DOM
Accessing elements in the DOM means finding specific parts of a webpage so we can manipulate them. JavaScript provides several methods for this purpose:
-
element.querySelector(selector)– returns a reference to the first element that matches the selector. -
element.querySelectorAll(selectors)– returns a NodeList containing references to all elements that match the selectors.
It’s important to remember that when using querySelectorAll, the return value is not a real array. It looks like an array and is iterable, but it’s actually a NodeList. The difference is that many array methods (like .map() or .filter()) are missing from a NodeList.
If you need those methods, you can convert the NodeList into an array using Array.from(), for example:
const paragraphs = document.querySelectorAll("p");
const paragraphsArray = Array.from(paragraphs);
Create DOM element
-document.createElement(tagName) – creates a new element of the given tag type.
const div = document.createElement("div");
This method does not insert the new element into the DOM right away. Instead, it creates the element in memory, which means you can manipulate it first (add text, attributes, classes, etc.) before placing it into the DOM.
Append elements
parentNode.appendChild(childNode)- appends childNode as the last child of parentNode.
// Create a new <div> element
const newDiv = document.createElement("div");

// Append it as the last child of the body
document.body.appendChild(newDiv);
parentNode.insertBefore(newNode, referenceNode)- inserts newNode into parentNode before referenceNode.
// Create a new <span> element
const newSpan = document.createElement("span");

// Select the parent (body) and a reference node (the first <div>)
const parent = document.body;
const referenceNode = document.querySelector("div");

// Insert the new <span> before the first <div>
parent.insertBefore(newSpan, referenceNode);
Remove Element
parentNode.removeChild(child)- removes child from parentNode on the DOM and returns a reference to child.
// Select the element to remove
const elementToRemove = document.querySelector("div");

// Get its parent
const parent = elementToRemove.parentNode;

// Remove the element
parent.removeChild(elementToRemove);
Altering elements
Once you have a reference to a DOM element, you can use it to change its properties. This gives you the ability to do many things depending on your needs such as adding or removing attributes, modifying classes, applying inline styles, and much more.
Adding inline style
When accessing or setting a CSS property of a DOM element in JavaScript (like background-color), you need to use camelCase instead (backgroundColor). Also, the value of the property must be given as a string (e.g., "red").
// Select an element
const box = document.querySelector("div");

// Change its background color
box.style.backgroundColor = "red";

// Change its width and height
box.style.width = "200px";
box.style.height = "100px";
Editing attributes
The setAttribute, getAttribute, and removeAttribute methods allow you to manage HTML attributes directly.
// if id exists, update it to 'theDiv', else create an id with value "theDiv"
div.setAttribute("id", "theDiv");

// returns value of specified attribute, in this case "theDiv"
div.getAttribute("id");

// removes specified attribute
div.removeAttribute("id");
Working with classes
The classList property gives you handy methods for manipulating classes without touching the whole class attribute string.
// adds class "new" to your new div
div.classList.add("new");

// removes "new" class from div
div.classList.remove("new");

// if div doesn't have class "active" then add it, or if it does, then remove it
div.classList.toggle("active");
Adding text content
The textContent property allows you to set or get the text inside an element.
// creates a text node containing "Hello World!" and inserts it in div
div.textContent = "Hello World!";
This will replace any existing text inside the element with "Hello World!".
Events and the DOM
Events are actions that users (or the browser) can trigger on a webpage. Common examples include mouse clicks, key presses, and resizing the window.
With JavaScript, you can make your webpage “listen” for these events and react to them, creating interactive behavior.
There are three primary ways to handle events:
-
Inline event attributes in HTML – specifying a function directly inside an element’s attribute.
-
Setting event handler properties – assigning functions to properties like
onclickoronmousedownon a DOM node in JavaScript. -
Using
addEventListener– attaching one or more event listeners to a DOM node in JavaScript (the most flexible and modern approach).
Method 1
<button onclick="alert('Hello World')">Click Me</button>
This solution is less than ideal because we’re cluttering our HTML with JavaScript. Also, we can only set one “onclick” property per DOM element, so we’re unable to run multiple separate functions in response to a click event using this method.
Method 2
<!-- the HTML file -->
<button id="btn">Click Me</button>
// the JavaScript file
const btn = document.querySelector("#btn");
btn.onclick = () => alert("Hello World");
This is a little better. We’ve moved the JS out of the HTML and into a JS file, but we still have the problem that a DOM element can only have one “onclick” property.
Method 3
<!-- the HTML file -->
<button id="btn">Click Me Too</button>
// the JavaScript file
const btn = document.querySelector("#btn");
btn.addEventListener("click", () => {
  alert("Hello World");
});
Now, we maintain separation of concerns, and we also allow multiple event listeners if the need arises. Method 3 is much more flexible and powerful, though it is a bit more complex to set up.
Best Practice
When working with DOM events, follow these three essential best practices:
-
Prefer addEventListener for flexibility - Use
addEventListenerinstead of inline handlers or property assignments. It allows multiple event handlers for the same event and provides better control over event behavior. -
Keep JS separate from HTML - Avoid inline event handlers in HTML. This maintains clean separation of concerns and makes your code more maintainable.
-
Use event delegation for dynamic elements - Instead of adding event listeners to individual elements, attach them to a parent element and use event bubbling to handle events from child elements.
Here’s an example demonstrating these practices:
// Good: Using addEventListener with event delegation
const todoList = document.querySelector("#todo-list");

// Event delegation - one listener handles all todo items
todoList.addEventListener("click", (event) => {
  if (event.target.classList.contains("delete-btn")) {
    // Handle delete button click
    event.target.closest(".todo-item").remove();
  } else if (event.target.classList.contains("complete-btn")) {
    // Handle complete button click
    event.target.closest(".todo-item").classList.toggle("completed");
  }
});

// You can also add multiple handlers for the same event
todoList.addEventListener("click", () => {
  console.log("Todo list was clicked!");
});
This approach is more efficient, especially when dealing with dynamically added elements, and makes your code more maintainable and scalable.
The Virtual DOM
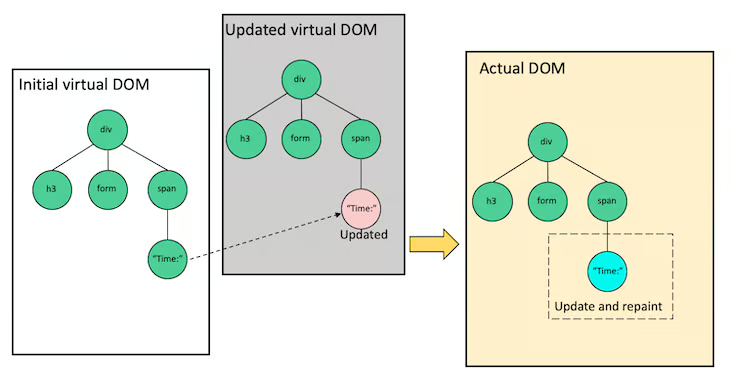
The Virtual DOM is a lightweight, memory-based representation of the real DOM. It is used by many modern frameworks such as React or Vue.
In vanilla JavaScript, when the content of a webpage changes, the DOM needs to be updated directly. This often means re-rendering large parts of the page, even if only small sections have changed. That requires extra computation and time.
The Virtual DOM solves this problem. Instead of updating the real DOM immediately, the browser creates a new Virtual DOM in memory that represents the updated content. It then compares this new Virtual DOM with the previous one, finds the differences, and updates only the parts of the real DOM that have changed. This process is called the diffing algorithm.
By using this method, updates are more efficient and the user experiences smoother performance.
Virtual DOM vs Real DOM
| Real DOM | Virtual DOM |
|---|---|
| The actual representation of the webpage structure in the browser. | A lightweight, in-memory copy of the real DOM. |
| Updates directly manipulate the real DOM, which can be slow. | Updates happen in memory first, then only the changed parts go to the real DOM. |
| Slower when frequent changes happen, since the whole DOM may re-render. | Faster and more efficient, as only the differences are applied. |
| Managed directly in vanilla JavaScript or jQuery. | Used by modern frameworks like React and Vue for optimized rendering. |
Conclusion
The DOM plays a central role in web development because it connects HTML, CSS, and JavaScript, allowing developers to bring interactivity and dynamic behavior to their webpages. Understanding how the DOM works is essential for writing efficient code and creating smooth user experiences.
The best way to practice is by building small projects, like a to-do list or a tic-tac-toe game, where you can experiment with different ways of interacting with the DOM and updating the content on the page. When you move on to frameworks, you’ll find it much easier to work with them if you’re already comfortable with the DOM. You’ll also gain a deeper understanding of how these frameworks automate and optimize DOM manipulation.
Mastering the fundamentals of the DOM is the first step before moving on to modern frameworks like React or Vue, which build on these concepts and introduce more advanced tools such as the Virtual DOM. A solid foundation in the DOM will make it much easier to learn and effectively use these frameworks in the future.